Sunday, February 5, 2017

Shut Up, Wesley!

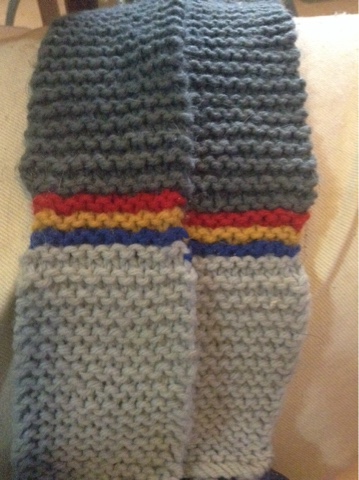
So, having made scarves for the three colors of TNG Starfleet uniforms, there was one very important uniform that I had left out.  Today, I rectify that omission.  I proudly present the Acting-Ensign Crusher uniform scarf.

While certainly not the...prettiest...of color schemes, I rather enjoyed the straightforward simplicity of this design.  Literally just straight rows of knitting.  No mid-row color changes.  No post-knitting embroidery to neaten up the diagonals.  And fewer ends to weave in, which is always a plus.

I felt I had to include this design with my other Trekkie scarves, because Wesley's uniform has become somewhat iconic amongst fans, despite being rather hideous.  Keeping in mind that this was a sci-fi show from the '90s, and there were quite a few fashion atrocities throughout, it does seem that poor Wesley bears the brunt of them.  I kind of wonder if Wil Wheaton did something at one point to piss off the costume designer...

Poor kid...

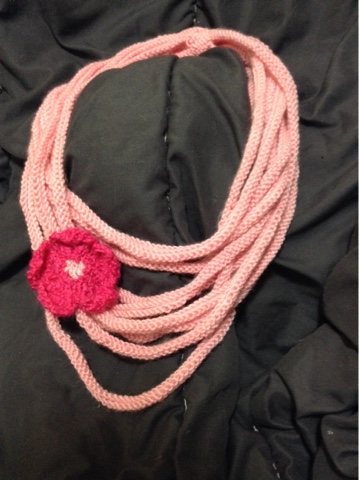
Anyways, my TNG scarf collection is now complete.  And since my little Pup seemed so determined to try it on (while it was still on the needles -- I had to untangle her several times), I made her a mini-sized one of her very own.  Daddy couldn't be happier.

Sunday, January 8, 2017

Ponies!

Soooo...given how pretty much awful this past year has been, how about we all just pretend it never happened and move forward, okay?  Sounds good to me.

Despite all the bad mojo of 2016 (and sometimes, even because of it) I still managed to get a ton of knitting done.  I'll be sharing some of those finished projects in the coming weeks, as well as those still on the go.  Up first is a small collection that I've had in mind for a while, but just finally got around to making.

I've made "ear" hats before, but these had to wait for just the right combination of colors to show up in my stash.  Add a bit of a fringe down the middle, and Boom!  Pony hats!

My Little Pony has made quite the comeback in recent years, with a show, toys, and style that is popular with many adults, as well as kids.  Not even joking, it's become so popular that they have their own convention.  With enough attendees that their dancing was falsely recorded as a small earthquake.  (Two or three years ago...look it up)

Anywhoo, these babies work up pretty fast, and I was able to whip up one for each of the six main (or mane, haha) characters: Applejack, Rarity, Rainbow Dash, Twilight Sparkle, Pinkie Pie, and Fluttershy.  I'm even making a couple of secondary characters, and maybe then a few custom colors for fans who have invented characters of their own.  Overall, it's a fun, quick project that keeps me interested because there are so many ponies to choose from, you never have to knit the same hat twice!

Friday, April 8, 2016

Trekkie Scarves!

My dear husband Kishi is a total Trekkie.  I still love him, though; no-one's perfect.  Our entire relationship has pretty much been a battle between the Force and the Federation, and while I do love the cheesiness of the original 60's era Captain Kirk Trek, I'd still take the Millennium Falcon over the Enterprise any day.  (I also proudly wear my Boba Fett shirt -- and helmet -- to Star Trek night with our friends, but that's mostly just to annoy them)

While I'm not an uber-fan myself, I have learned to take inspiration where I can find it, and Star Trek has certainly given me a few ideas.  (The Bajorans on Deep Space 9 have some gorgeous knitted clothing, which I really want to pattern up...)  Kishi is a real Next Generation fan, and the geometric pattern of their uniforms translates well into various knitted forms.

These scarves are recognizably Trekkie, but not "OMG, you're a nerd!" Trekkie.  I actually rather like them.  Of course, they come in command red, engineering and security gold, and science and medical blue.  (I think I got those designations right...)  Personally, I think I'll be keeping a blue one for myself.  As Spock would say, "It's only logical."
It took me a little longer than usual to get these finished, as I had to contend with what is probably a sprained thumb.  (I fell off the couch...no lie)
Live long, prosper, and stay warm.
In the end, I did three versions: a color-block (with and without the stripe) and a solid.  Which do you prefer?

Tuesday, April 5, 2016

Dragons and Mermaids!

I'm sure by now, almost everyone has seen the mermaid tail blankets that seem to be popping up all over the Internet.  I must say, I think they are super adorable, and I want to be friends with whoever came up with the idea.

Well, a friend of mine came across the idea too and wanted one, and I was super stoked that she thought of me to make it.

She wanted one for her niece...and something for her nephew too.  What to do?  We talked about sharks, and a few other options, and settled on a dragon.  Because what kid doesn't want to be a dragon, right?

So a mermaid and a dragon...what could be easier?  Well, for starters, I couldn't find a pattern I liked.  I know, I know, I was probably just being difficult.  But I just didn't feel the "Oomph" from any of the patterns I came across.

So what do I do?  Of course, I make my own.  OMG, it takes so much math!  In the end, though, it all worked out.  And I even wrote it all down, so I can do it again, if I have to.

Really, I loved both these pieces so much, it hurt me to see them go...but I know the little ones they are meant for will enjoy them, so I'm also glad.  

It took about two months of constant devotion, ignoring all other projects I had on the go, but I can honestly say that my first real commission was a resounding success.  (At least, Auntie loved them...she'll be bringing them home soon!)
I promise to go into more detail on each of these gorgeous blankets later, but for now, I'm going to go launch myself into my next project.  Allons-y!

Wednesday, March 23, 2016

Deconstruction!

So, I decided I was finally ready to take a stab at reclaiming some yarn.  Since it was my first time trying it out, I figured it might be easier to start with a chunkier weight until I get the technique down.  I picked a dark charcoal cardigan that is a wonderfully soft cotton-acrylic blend, and may likely be reborn as a cowl.  Plus, added bonus -- the sweater ended up being knit with two strands together, so twice the yardage!

Well, let's get to it, shall we?

A knit or crocheted seam is the winner
First of all, when picking a sweater for reclaiming, one of the first things to look at are the seams.  A knit or crocheted seam, like in the picture above, is what you're looking for.  A machine-sewn seam, like the one below, won't do you any good because it means the material was cut, and you'll just end up with a bunch of short pieces of yarn when you unravel it.  (Note: some garments have button bands or edges that cover the seams -- these can be a gamble, since you don't know what's underneath.)
Anything machine sewn just won't work out well
Another important thing to check is the tag -- that will tell you what the fibres are made of.  Most clothing today is made from acrylic or other man-made materials.  Acrylic yarn itself is fairly cheap, so it's up to you if you want to put in the time and effort to recycle it, or if the cost of the garment is worth it for the amount you'll get.  Try to avoid anything with a lot of elastic fibres if you can...they're just a pain to knit with.
Sometimes (like here) the 1% lycra is a separate strand, which is easily removed when unraveled

Personally, I went in hunting for natural fibres for the most part this time around, since they're usually beyond my price range, but I did pick up a couple of acrylic blends that were just too soft and wonderful to pass up.  

Be sure to check the condition of the garment as well...any signs of moth damage means it's a no-go -- you do NOT want to risk the rest of your stash by bringing moths home, and the yarn is likely pretty damaged anyway.  A small hole or repair isn't too bad, though you might end up with a few shorter lengths.  Wool tends to felt together over time, so check for felting.  Felted yarn won't unravel, so it's a waste of time and money.  (Unless you're looking for felted material to use for sewing projects...but that's a whole other subject.)

Once you've got your sweater, the first step is to remove any tags or buttons that would get in the way, then find a seam and start dismantling it.  Most seams would logically start at the bottom, or under the arms, or the end of a sleeve.  Whoever was making this particular sweater may have been drinking that day, because it was really all over the place.  (One sleeve started in the middle, and worked out to each end...?!?)  A seam ripper might come in handy, or you could always help it along with scissors (as long as you're careful not to cut the material itself).  Personally, I hang onto the lengths of yarn from the seams, in case I need them later for seaming or repairs, or just as scrap yarn.

This is what a sweater looks like after it's been taken apart
Once you've dismantled all the pieces, we get to the fun part: unraveling!  Now, there's no rule saying you can't unravel as you go, but I wanted to show you what it would look like all taken apart.

Most pieces unravel from the top (this is the top of the sleeve)
Once you start unraveling, you'll notice the yarn tends to hold its kink.  Some people wind the yarn loosely into hanks, leave it to soak for a bit, and then hang it to dry with a weight at one end...but I don't have time for that today.  (Or the equipment...yet)  So for the interim, I'm just winding it into temporary cakes.  I cut a slit in the end of a toilet-paper tube, slipped in the end of yarn, and started winding.  One day soon, I will have a ball-winder to do this for me, but for now, it works.  (Also, shoutout to Kishi for the idea to use the TP roll!)  One nifty tip would be to keep the tags from the sweater and pin them onto the yarn -- that way, you know what it is, and have the washing instructions handy!
These balls are HEAVY!  First trial: Success!
So from this one sweater, I got these three hefty cakes of yarn.  Eventually, I'll get around to weighing them, getting the yardage, and winding them properly...but my arm is tired.  So for now, I'm just going to caress them softly while muttering "Precious!" every so often, while Kishi eyes me with more and more concern.

Goodnight, Precious...

Tuesday, March 8, 2016

Time for Spring!

I don't know about you, but I am NOT a winter person.  If I could realistically hibernate, I would.  I don't like the cold, the snow in the city just looks grey, and getting anywhere at all is just a nightmare.  So, now that the weather has lightened up for a bit, I am more than ready to get into the Springtime mood.

I spotted a scarf like this a while back, but couldn't find it again...so I took a guess at how it was done, and this is what I came up with.  I used some of the pink yarn I had left over from Arya's sweater, and stitched on a little Sakura blossom (I seem to have a fixation on them right now...they're just so pretty and spring-like!)  

I love the way the flower turned out, though it was a bit fiddly to stitch the petals together.  I made each one separately and sewed them to the centre, then stitched the whole thing to the scarf.  Next time, I might try to find a way to do the whole thing as one, but I might need to work on my crochet skills to manage it.  

I loved making this so much, I did a second one in the raspberry pink, with a little rose blossom.  I also had a great idea to make one in green, with a shamrock for St Patty's Day...but I only got the idea on St Pat's...so maybe soon I'll have it done.

It's lovely and light, knit in DK, and definitely makes me feel like spring is on its way.  Eventually.  Though being Canada, I don't put away my winter wear until June...

Saturday, March 5, 2016

Upcycling!

One idea I've been toying with for a little while is recycling -- or upcycling -- yarn.  I'd first heard the practice mentioned in a post on Facebook ages ago (before that handy "save post" feature).  When I read "recycled/reclaimed yarn", I immediately pictured some ugly homemade sweater that someone's great-aunt knit them and they donated asap.  Why would someone want to reuse ugly, scratchy wool? I thought.

It slowly dawned on me, as I saw more and more posts and links popping up on my feed -- there might just be something to this after all.  So I checked out a few blogs and how-to's, and I came to see how limited my thinking was.  Don't get me wrong...no-one wants to repurpose Great-Aunt Sally's technicolor steel-wool monstrosity.  

But a $5 sweater might just get you several hundred yards of cashmere.  Or silk.  Or angora.  Or who knows what else.  I had never even considered factory-knit garments.  Duh!  They tell you right on the tag what's in 'em!  And there are entire aisles of knitwear just waiting to be rifled through at the thrift store.

So, having done a little research, I optimistically headed out to Value Village with a vague, half-baked plan.  (But really...do I ever have any other kind?)  My basic goal was to see just what kind of fibres I'd be able to net...and I gave myself a budget of $50.

For $50, you might be able to get a couple of decent skeins -- or one really good one -- from your local yarn shop.  Or you could get several cheap ones from WalMart.  (Not to knock those of us knitters on a budget, of course)  But let's take a look at what $50 got me.

After two or three hours of fondling most of the garments they had to offer and finally weeding down my selections, this is what I ended up with.  
These sweaters are all SO soft!
And, for another $50, I also got these.  Like I said, half-baked plan...thankfully, there was a 30% off deal, so I really only went $20 over budget.  Thirteen sweaters!
I can never find metallic yarn in the colors I want, but I CAN find sweaters!
Totally worth it, though.  I scored a great assortment of angora, merino, a bit of alpaca blend, some mohair...and a gorgeous cashmere!  (They had another as well, but the color kind of reminded me of vomit...)  Plus I nabbed a couple of sparkly blends, because I love sparkles and I can never find any in the colors I want.  And they all feel so soft and squishy!
Everyone collects something.  My collection just happens to be somewhat grotesquely beautiful.
So here's my first haul, ready and waiting to be ripped apart and given new life.  Oh, and I also found a new mask for my collection!  (I hang them in the bathroom to make my friends uncomfortable when they come over -- because I love them)

Right now, I think I'll just sit for a bit.  And try not to think about going back for another load just yet...


Wednesday, February 24, 2016

Use the Force!

So this is an idea that popped into my head a while ago, that I have been just dying to get on the needles: lightsaber scarves.  I was amazed that I couldn't find any patterns online, so I had to make up my own.  Finding the right yarn was a little tough, since I often shop online and it can be difficult to find just the right colors.  (As a hardcore fan, anything less than perfection is unacceptable.)

My first trial was Qui-Gon Jinn's 'saber from Episode 1, which has always been one of my favourites for its simplicity of style.  I wasn't sure at first about the lime green for the blade -- on its own, it looks rather yellow -- but it actually worked perfectly and I love it.  
I wish I'd had this finished in time for Episode VII
Since most of the hilt ends are done in more than one color, it is very important to remember to wrap the new color under the other on the wrong side (back) before continuing the row, or else you will end up with gaps where the colors switch.
Note the black is looped around the grey, to hold it together

I embroidered over the edges of the black to give it a cleaner line, and the red button is just a simple little bubble (popcorn) stitch -- cast on 2, kfb in both, k2tog twice, k2tog again, then pull the tail through that last stitch and sew it on.  Voila!

As soon as my computer is back in the land of the living, I'll be patterning this baby up on Ravelry.  I also have patterns in the works for just about every other lightsaber in the movies, as well: Obi-Wan's, Luke's, Vader's, even Darth Maul.  Plus, it's easy to customize any color "blade" (Kishi wants me to do a pink one for our little Pup), if you want to get all wild and crazy.  Kylo Ren's might take some extra creativity, though...I think I'll just stick to the first six movies for now.

*Also, for those interested, I do sell these and other designs through my Etsy shop, which is now open!  Find me at https://www.etsy.com/ca/shop/DizzyStitchin *  

Tuesday, February 23, 2016

Squishy Mail!

Have you ever come up with a great design and wanted to cast on immediately?  But you don't have the right yarn for it, so you have to wait until you can afford to order it?  Then you order it, but you have to wait for it to arrive?

THEN IT FINALLY ARRIVES AND YOU'RE SO EXCITED YOU RIP THE BOX OPEN AND GRAB YOUR NEEDLES AND GET STARTED RIGHT AWAY? 

This is me today.
I literally just opened the box 20 minutes ago.  Excited?  I think so!
I have been waiting for weeks to be able to test out this idea for a pattern, and my happiness level right now is off the charts (haha, knitting joke...).  I kind of feel bad for all my other projects, which will now have to wait just a bit longer to be finished.  But I've got a box load of new yarn here just begging me to use it...
One of the first times I've ordered yarn with specific projects in mind
That right there is sixteen 8oz balls of worsted, my friends.  It's looking like it's gonna be a long night.  (But TOTALLY worth it!)

Friday, February 5, 2016

Experiments!

This post is long overdue, and has been sitting in my drafts for about two weeks now.  What was supposed to be a post-holiday break for relaxation and me-knitting...well, it kinda got away from me.  First of all, Arya has gone from just learning to crawl to trying to walk in about a week and a half -- and is like a hurricane blowing through my living room.  Then, all of us got sick, which was no fun.  Plus, my computer decided to up and die on me, so I'm stuck updating from my iPad (hence the lack of formatting...apologies).  Anyways, there hasn't been a whole lot of time for knitting, but I've been doing what I can.

Still, I did manage to get another Zig-Zag Scarf off the needles, and I absolutely love the colors of this one.  A fiery mix of purple, red and orange, I have kept with my impromptu scheme and dubbed this one "Thor on Fire".  It made me giggle.  I wanted something that didn't require a lot of thinking or pattern reading, and this is a super easy go-to for me.  
I want to make all the things in this yarn
I've been putting in a few rows here and there on a few experiments, as well.  I say experiments because, well, I really have nothing but a vague idea going in that I play around with until it turns into something I'm satisfied with.  This one is a cotton scarf done in fan and feather, on a diagonal.  Because apparently I feel I should be doing more math with my knitting.  (A twelve stitch pattern, over four rows, two increases per repeat...carry the one...divide by zero...)
Love the colors of this yarn -- called "Hydrangea"

I'm also working on a cardigan for myself, but the pattern itself is in French, so it's slow going since I need to translate the terms used as I go.  So far it's turning out great, though!  

On the plus side, I've got a ton of new designs and patterns sketched out, so as long as I can keep up a steady stream of new yarn into my stash (is that ever REALLY a problem?) I'll have a bunch of new stuff to share with you all soon!

Sunday, January 10, 2016

Patterns Going Live!

Between working on the various projects I've got on the go (I recently came down with a mild case of start-itis) I have also been busy designing some new patterns and writing up some of my older ones.  It's taken me a bit longer than I'd hoped, especially with a teething baby who insists on attaching herself to me at all times.  They will be available for download through Ravelry, so feel free to look me up there as DizzyStitchin.  

Over the next few months, I will also be working on opening an Etsy shop that will feature some of my finished projects for sale (those I can bring myself to part with, anyways).  It'll take a while to get everything up and running, but bear with me.  

In the meantime, my needles are busy juggling a scarf, a tunic, a sweater, two shawls, and a poncho...not to mention all the ideas I've got bouncing around still waiting to be cast on.  Those extra needle sets I got myself for Christmas are sure getting a workout!  My birthday is coming up, so I think I may be gifting myself some new yarn...which may also be what my dear hubby has hinted at giving me.  Either way, I see a whole lot more knitting ahead this year!  

Tuesday, December 29, 2015

Christmas(-ish) Shawl!

Every year, I get myself an Advent calendar.  It's a tradition I've hung onto since I was a kid.  I don't always eat the chocolate each day -- sometimes I'll leave it for a few days, then eat five or six or twelve at a time to catch up.  One year, I got the calendar on Christmas Eve, so I just ate the whole thing at once...but I digress.

Anyways, I decided to get myself a different kind of Advent calendar this year (in addition to the chocolate Avengers one I already got).  It's a knit-along Advent KALendar.  Basically, each day leading up to Christmas, they release another little chunk of the pattern, so that by Christmas, you have a finished project.  I thought this was a super cute idea.

Day 1
You don't get to see the finished design until the end, so there's a bit of trust involved when getting into one of these.  Anna Dalvi, who designed the shawl, has some very lovely designs, so it was a leap of faith I was more than willing willing to take.  Plus, the inspiration for the designs comes from two of the Slavic goddesses, and I'm a sucker for mythology.

With all of the other projects I've had on the go, plus all the regular Christmas preparations like shopping and wrapping, plus the baby...well, I knew that I wouldn't be able to keep up with the pattern releases and be finished by Christmas, and it takes considerably longer to knit up even a few rows than to eat a dozen or so little chocolates.  Still, starting late is better than not starting at all.
Day 2
I've managed to avoid the Ravelry forums for the KALendar so far, since I don't want to ruin the surprise for myself as everyone shows off their work, but from what I've managed to get finished, it's going to look fantastic.  There's little picots along the edge, which is a new skill for me, and I'm working it in red and black, to go with most of my fancier outfits.  I'm also thinking of adding some beadwork to it when I'm done, but I'll figure that part out later.

Day 3
Wishing you all the best for whatever holidays you're celebrating this time of year, and I hope you have had a chance to relax and enjoy yourselves!

Sunday, December 20, 2015

Pom-Poms!

I'm a total sucker for unusual and novelty yarns.  Sometimes you find a yarn that just calls to you, even though you have no idea what you're going to do with it.  I found such a yarn, in many colors, and it sat in my stash for months.  Then, suddenly, inspiration struck.  Basically, I had Christmas gifts to give, and a whole lot of yarn to use.
Pom-Poms for all!
  When I first bought this yarn, I bought a whack-load of it.  I'm pretty sure that's the technical term.  The cashier was a knitter herself, but even though she thought it was "so neat", she had no idea what to do with the yarn I chose.  Hopefully, she finds this blog and gets a few...because I've come up with several.

Most commercial yarns come with a pattern on their labels...generally something basic, like a scarf.  I took that idea and got a bit more creative with it.  This yarn gives a lot of creative leeway, once you learn how to work with it.  Keeping in mind it called for a US9 needle, I just sort of let my intuition guide my work from there.

The first work was a cowl and matching headband.  The cowl was worked eight Poms wide, 52 rows long, and the headband was four Poms wide, 42 rows long.  Each was twisted, and then sewn together to give it a mobius shape. It's a great style for the younger crowd, or the more fashion-forward.  My sister Naomi has that sort of "it's-quirky-but-it-totally-works" kind of style, and she was the first one I thought of when I came up with this design.

The pinks in this just screamed Naomi
To get the mobius shape, it would have been possible to knit the whole thing in the round, simply twisting the stitches once before joining, but the finished piece would have had no give to it.  Since a bit of elasticity is good in this sort of thing, I opted to go through the extra step of sewing it together later, in order to get the proper fit.

The second work was a more classic scarf, seven Poms wide.  A hole was worked into the design 40 rows in, so the scarf could be looped through itself, without having to be tied.  Another great style, which doesn't have to sacrifice function for form.  One great advantage to this pattern is its simplicity to use -- my mother-in-law suffers from arthritis, so not having to tie and untie a knot is much simpler.  Also, I'm rather lazy, so I made one of these for myself.  All you have to do is bind off the six middle stitches (keeping four on either side) after 40 rows, which is 20 rows of Poms on each side (counting your cast-on as the first row).  Then, on the next row, cast on those six stitches again, and just keep knitting till the end of the yarn.  

A no-knot scarf -- perfect for anyone on your list!
Knitting with the Pom-Poms is a bit of a trick -- basically, you knit two stitches between each Pom, one just before, and one just after.  You start with a stitch just before a Pom, and you end with a stitch just after one.  So, if you're knitting a scarf, for example, seven Poms wide, you'd have fourteen stitches in total.  Once you get the hang of it, the yarn knits up rather quick.  

These Poms are so soft, I just love it!
I was working on one of these at the doctor's office, and an older lady stopped by to watch.  She'd seen the yarn in stores, but wondered what it would look like knitted up.  We sat and chatted for a bit, and I gave her a couple of tips.  It made me think that, when I'm knitting things for my own grandkids, I hope I still have that urge to learn something new.  And hopefully, there will be lots more interesting yarns to work with!


Tuesday, December 15, 2015

Phew!

So, in my frenzy of preparing all my hand-knit goodies for Christmas, I forgot one major mistake in my scheduling.  I did not, in fact, need them ready for Christmas...I needed them ready for our family and friends get-together -- which was this past Saturday.
A no-knot scarf -- just pull the end through the hole!
I love this yarn, it looks like confetti exploded all over it

A twisted cowl and matching headband
Hats of every size!

So...much...knitting...
All packed up and ready to go


With a few late nights, three and a half seasons of Merlin, and the ability to knit like the wind, I can happily say that I have completed my quest.  The gifts have been given (and happily received) to all but a couple of people I'll be seeing later on, and my hands can now take a well-deserved rest.  Although, there is that lovely grey worsted that has been begging me to become a sweater...


Thursday, December 10, 2015

An Early Christmas Gift For Me!

So I'm probably a bit more excited about this than I should be...but I got a package in the mail yesterday that I've been waiting for for a while now.  My first set of bamboo double-pointed needles!  Well, technically, 16 sets of dpn's, one in each size of needle.  They were on for a super great price.
I had to label each package in the US size, since the needles themselves are only marked in metric
And the best part of my new gift to me?  I can use them to make gifts for everyone else!

Working with dpn's is another skill that I used to find intimidating -- or at least, confusing.  Kishi often remarks that he believes me to be a wizard, and my knitting is some sort of sorcery.  (I am alright with this.)  But once I got started, my hands seemed to figure it out on their own.  The biggest thing to remember is to double and triple check that your cast-on stitches are straight before joining them to knit in the round.  Considering you're generally using three or four needles at a time, that makes three or four more chances for your stitches to get twisted.  Also, try to keep your stitches centered on the needle, so they don't slip off the end while you're working.
So much faster than knitting flat and sewing it up later!
These new needles will definitely help speed up my gift-making, and besides, one can never have too many needles.  The more needles, the more projects on the go, right?  Now, let's just see how long it takes me to mix up the packages...